The Fantastic Homegroup
By kyle on March 12, 2013
There used to be a time when sharing files and printers across a home network was such a headache! You would have to set permissions, find out IP addresses, and go through such a horrible interface you would want to pull your hair out. But all that has changed in Windows 7 and Windows 8. Through a built-in utility known as Homegroup, users can access files and printers easier than ever. It’s simple, painless, and takes only a few minutes to set up.
How to Set it Up
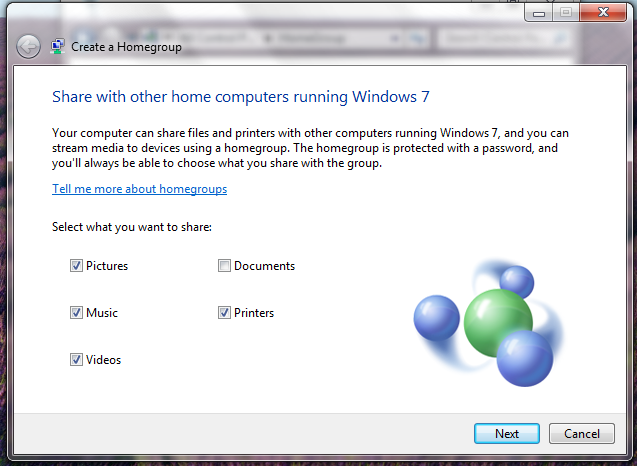
1. From within the Control Panel, click on the network and internet tab. Click on Homegroup and click join a homegroup. From there you will be able to set up which types of files you would like to share. Check all the ones that apply. You can also create one if one isn’t yet made.
2. Next it will give you a password for the homegroup which you can either write down or print out. This is important because this code will allow other computers to connect to the homegroup on this network.
3. There is an option under “other homegroup actions” that will allow you to customize your homegroup to your liking. This works similiary to the password for a network.
4. Now you are all set up. In the Explorer, in the side panel under Homegroup you should see the name of the user. From there, you can access the files that are being shared by other users on the homegroup.
5. By adding files to your libraries, you can share custom files and folders across the netowork as well as printers.
Summary
Homegroup is an easy and efficient way to share multiple files and printers across a network. It eliminates the need to email files or use your jump drive to access files on different computers. It’s a little talked about feature that everyone should try it. It’s simply too simple not to. If you have problems setting it up or questions in general, contact a local computer repair company to assist you.
For a Free Computer Repair Quote Call (202) 670-9966
Related Computer Repair Articles
How to speak to a computer repair professionalPC developers look to other channels for future profits
How to put your PC into safe mode
Jury still out on the new wave of tablet/laptop hybrids
Issues with Mac Optical Drives


Leave a Reply